
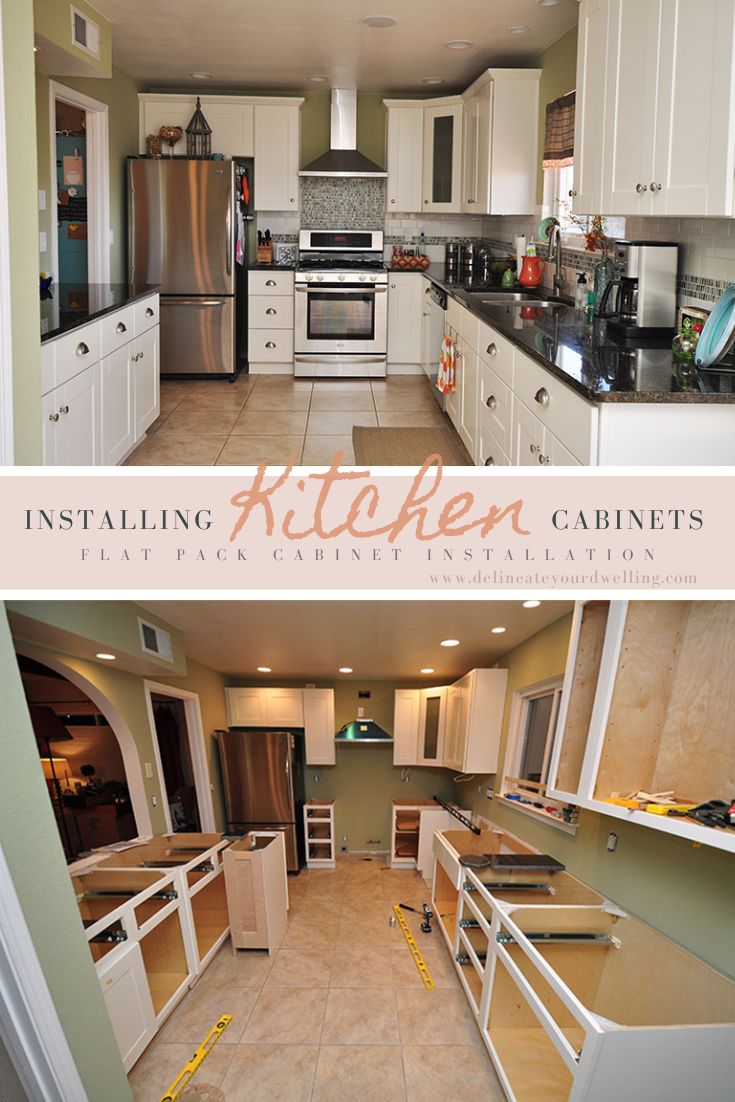
Are you ready to transform your kitchen with a fresh, stylish look? Installing kitchen cabinets might seem like a tough job, but with the right steps, you can do it yourself and save a lot of money.
Imagine having your new cabinets perfectly in place, giving your kitchen that clean, organized feel you’ve always wanted. This guide will walk you through every step, making sure you avoid common mistakes and get professional results. Whether you’re upgrading an old kitchen or starting from scratch, you’ll learn how to handle your tools, find studs, level cabinets, and secure them safely.
Keep reading, and soon you’ll have the confidence to install your kitchen cabinets like a pro!
Tools And Materials
Essential tools include a drill, screwdriver, level, and measuring tape. A stud finder helps locate wall studs for secure mounting. A clamp keeps cabinets steady during installation.
Materials needed are kitchen cabinets, screws, shims, and wood glue. Use caulk to seal gaps. Choose screws that fit cabinet frames and wall type.
Safety gear protects during work. Wear safety glasses to guard eyes from dust and debris. Use work gloves to avoid splinters and cuts. A dust mask helps breathe clean air when sanding or drilling.
Preparation Steps
Start by clearing the workspace. Remove all items and furniture from the kitchen area. This gives you a safe, open space to work. Protect floors with a drop cloth or cardboard to avoid damage.
Next, turn off utilities. Switch off electricity at the main breaker to prevent accidents. Shut off water supply to avoid leaks during cabinet removal. Safety is very important.
Finally, focus on removing old cabinets. Use a screwdriver to take out screws holding cabinets to walls. Carefully pull cabinets away without damaging drywall. Keep screws and hardware if you plan to reuse them.
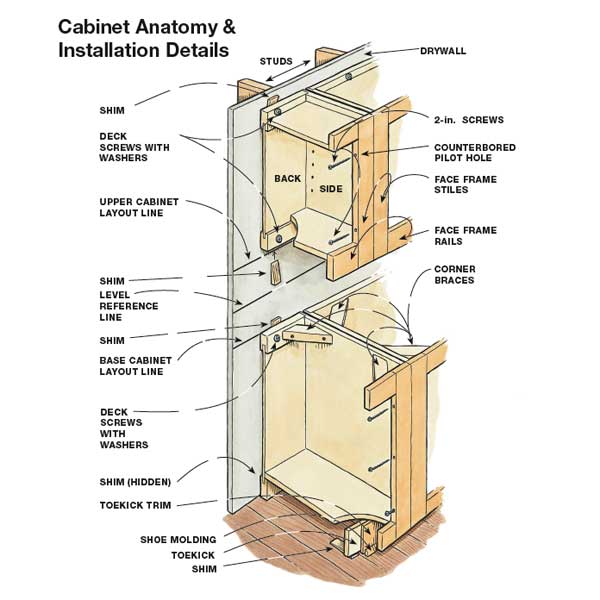
Locating And Marking Studs
Use a stud finder to locate wall studs accurately. Move it slowly across the wall. Mark each stud spot with a pencil. Studs are usually 16 or 24 inches apart. Mark all the stud locations along the cabinet area.
Marking studs helps you secure cabinets firmly. Cabinets attached to studs will hold weight better. Use a level to check marks are straight. Draw a light horizontal line connecting stud marks. This will guide cabinet placement.
Out-of-square walls can cause uneven cabinet fitting. Measure the wall corners with a carpenter’s square. Adjust cabinet positions to fit irregular walls. Sometimes, shims are needed behind cabinets for balance. Always check cabinet alignment before final mounting.
Installing Base Cabinets
Begin with the corner cabinet, as it sets the base for others. Place it carefully at the corner where two walls meet. Use a level on top to check if it is straight. If the cabinet tilts, place shims under it to make it even. Shims are small wedges that fill gaps and balance the cabinet.
Next, secure the cabinet to the wall. Find the studs behind the wall using a stud finder. Drill pilot holes through the cabinet frame into the studs. Then, drive screws to hold the cabinet tight. Make sure it does not move or wobble.
After the corner cabinet is secure and level, attach the other base cabinets one by one. Use clamps to hold cabinets together before screwing them. Check the level often to keep the line straight.
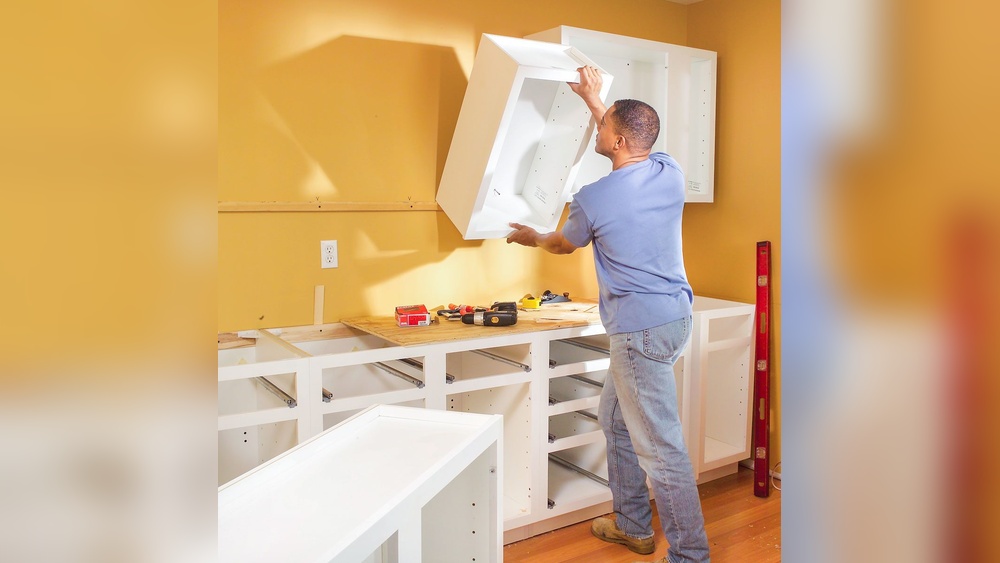
Installing Wall Cabinets
First, attach a ledger board on the wall to support the cabinets. Use a level to make sure it is straight and strong. Secure it with screws into wall studs.
Next, lift the cabinet onto the ledger board carefully. Hold it tight and check that the cabinet sits flat against the wall. Use clamps to keep it steady if needed.
Check if the cabinet is level and plumb. Use a level tool on the top and sides. Adjust by tapping shims behind the cabinet or tightening screws. This keeps the cabinet aligned perfectly.
Connecting Cabinets
Start by aligning the edges of the cabinets carefully. Make sure the cabinet faces are flush and level. Use clamps to hold them tightly together.
Secure cabinets by driving screws through the adjoining sides. Use long screws for a strong hold. Drill pilot holes to avoid splitting the wood.
Check for any gaps between the cabinets. Small gaps can be fixed by adjusting clamps or sanding edges slightly. Ensure cabinets sit flat against the wall and each other.
Double-check the alignment with a level and adjust as needed. Tighten all screws once everything fits perfectly.
Finishing Touches
Start by reattaching the cabinet doors and shelves. Use the screws and hinges you saved earlier. Make sure each door opens and closes smoothly. Adjust hinges if needed for proper alignment.
Next, install the hardware. This includes handles and knobs. Use a drill or screwdriver to attach them securely. Measure carefully to keep all hardware in the same position.
Finally, clean the area. Remove dust and debris from the installation. Wipe down cabinet surfaces with a damp cloth. Check for any leftover screws or tools on the floor.
A neat workspace helps you enjoy your new cabinets more.
Common Challenges
Handling heavy cabinets requires at least two people. Cabinets can be bulky and hard to lift alone. Use proper lifting techniques to avoid injury. Secure the cabinets firmly before releasing them.
Dealing with uneven walls means checking the wall surface first. Use shims to fill gaps between the cabinet and wall. This ensures the cabinet sits flat and stable.
Troubleshooting leveling issues involves using a level tool often. Adjust with shims or screws until the cabinet is perfectly level. This helps doors close properly and prevents damage.
Tips For Beginners
Working with a helper makes the job easier and safer. One person can hold the cabinet while the other secures it. Communication is key to avoid mistakes.
Taking your time helps ensure cabinets are level and aligned. Rushing can cause errors and damage. Check measurements twice and adjust slowly.
Using temporary supports holds cabinets in place before fixing them permanently. Supports prevent cabinets from falling and keep them steady. This step saves a lot of trouble later.

Frequently Asked Questions
How To Install Kitchen Cabinets For Beginners Step By Step?
Measure and mark wall studs. Attach a temporary ledger board. Remove cabinet doors for ease. Start with corner cabinets. Level and secure cabinets to studs. Connect cabinets tightly. Reinstall doors and shelves.
Is It Easy To Install Your Own Kitchen Cabinets?
Installing your own kitchen cabinets is doable with patience, proper tools, and accurate leveling. Secure cabinets to wall studs for safety.
Do Cabinets Need To Be Screwed Into Studs?
Yes, cabinets must be screwed into studs for secure support. Anchoring to studs prevents damage and ensures stability. Use a stud finder to locate them before installation.
How Much Does It Cost Per Foot To Install Kitchen Cabinets?
The cost to install kitchen cabinets ranges from $100 to $300 per linear foot. Prices depend on cabinet type, labor, and location. Custom cabinets cost more, while stock options are cheaper. Additional fees may apply for removal or wall repairs during installation.
Conclusion
Installing kitchen cabinets takes time and care but is doable. Follow steps carefully and use the right tools. Start with the base cabinets and work your way up. Check levels often to keep cabinets straight. Secure cabinets well to the wall studs for safety.
Take breaks to avoid mistakes and stay patient. A well-installed kitchen cabinet improves both function and style. Your effort will make your kitchen look neat and organized. Keep these tips in mind for a smooth installation. Enjoy your refreshed kitchen space once done!

Yes, working as , Food Blogger and Product Reviewer for last 6 years. Here you will get amazing deals for Smart kitchen products. I am your best source for the latest update in cooking trends. I provide insightful articles, reviews, and analysis on cutting-edge kitchen gadget. My mission is to empower readers with the knowledge they need to stay ahead in a rapidly evolving coking world. Join me as we explore the future of food technology and how it shapes our lives today and tomorrow.