
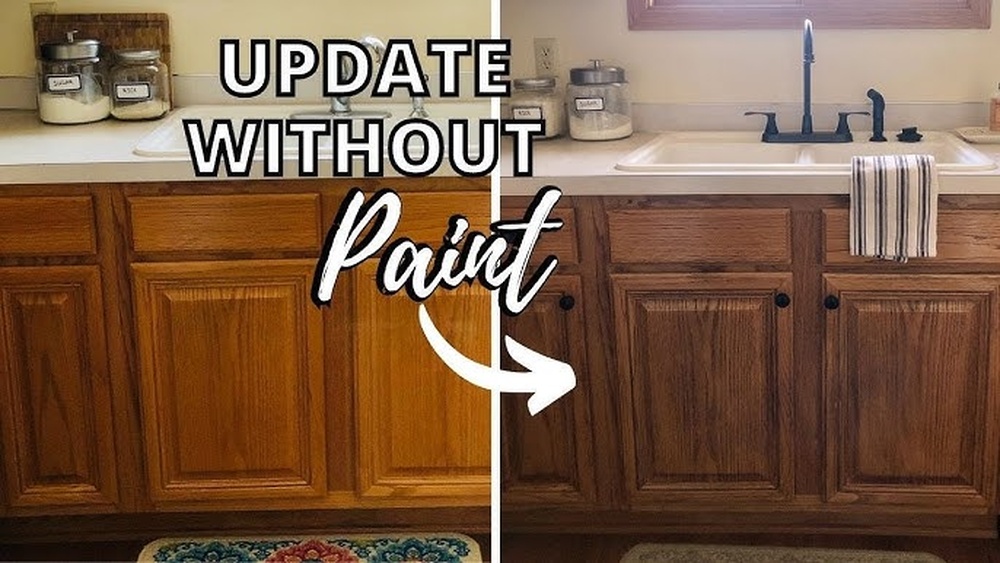
Are your kitchen cabinets looking tired or outdated? Restaining them can instantly breathe new life into your space without the cost of a full replacement.
But how do you achieve that fresh, polished look without making costly mistakes? Whether you want a richer, darker finish or a lighter, brighter tone, knowing the right steps can save you time and frustration. In this guide, you’ll discover simple, effective techniques to restain your kitchen cabinets like a pro—even if you’ve never done it before.
Ready to transform your kitchen and bring out the natural beauty of your wood cabinets? Let’s dive into everything you need to know to get started today.

Preparing Cabinets
Start by removing all hardware like knobs and hinges. This makes the process easier and cleaner.
Use a screwdriver to carefully take off handles and door pulls. Store them safely to reuse later.
Next, clean all surfaces thoroughly. Use warm, soapy water or a gentle cleaner to remove grease and dirt.
Rinse with clean water and let the cabinets dry completely before moving on.
Check the cabinets for any damage. Small cracks or dents need fixing before staining.
Fill holes or scratches with wood filler. Let it dry, then sand smooth with fine-grit sandpaper.
Sanding also helps the stain stick better by smoothing rough spots and removing old finish.
Sanding Techniques
Light sanding helps remove dirt and rough spots on cabinets. It is best for applying a darker stain over the old one. Use fine grit sandpaper (220 grit) to gently sand the surface. This creates a smooth base for the new stain to stick well.
Heavy sanding is needed to make cabinets lighter. It removes most or all of the old stain. Use coarser sandpaper (80-120 grit) to strip the old finish. Then follow with finer grit to smooth the wood before staining.
| Purpose | Sanding Type | Sandpaper Grit |
|---|---|---|
| Restain darker | Light sanding | 220 grit (fine) |
| Restain lighter | Heavy sanding | 80-120 grit (coarse to medium) |
Stripping Old Finish
Selecting the right chemical stripper is key for removing old finish. Choose one that suits your cabinet material and finish type. Water-based strippers are gentler and less smelly but may take longer. Solvent-based strippers work faster but have stronger fumes. Always read the label for compatibility.
Apply the stripper evenly with a brush or cloth. Let it sit for the time the instructions say. You’ll see the old finish start to bubble or peel. Use a plastic scraper to gently remove the softened finish. Avoid metal scrapers to prevent wood damage.
Wear protective gloves, goggles, and a mask to stay safe. Work in a well-ventilated area. Keep children and pets away. Dispose of used stripper and rags properly, as they can be flammable. Clean the cabinets with water or recommended cleaner after stripping to remove residue.
Choosing Stain
Gel stains are thick and easy to control. They sit on top of wood, giving an even finish. Gel stains work well over old finishes without sanding deeply. They dry slower, allowing better color control.
| Type of Stain | Benefits | Drawbacks |
|---|---|---|
| Oil-based | Penetrates wood deeply, durable finish. | Strong smell, longer drying time. |
| Water-based | Low odor, quick drying, easy cleanup. | Less durable, may raise wood grain. |
Choosing a color depends on your kitchen style. Dark colors hide stains well but can make space look smaller. Light stains show wood grain and brighten the room. Test a small spot before staining all cabinets.
Applying Stain
Tools needed include brushes, rags, gloves, and sandpaper. A foam brush works well for smooth application. Use tack cloth to remove dust before staining.
Applying gel stain is easier on cabinets with old finishes. Gel stain sits on the wood surface, giving more even color. Apply with a brush or cloth in small sections.
Use gentle, even strokes to avoid blotches. Wipe off excess stain within minutes for a uniform look. Work quickly but carefully.
| Step | Drying Time |
|---|---|
| First coat | 2-4 hours |
| Second coat (if needed) | 4-6 hours |
| Final cure | 24-48 hours |
Let cabinets dry fully before adding a clear coat. Proper drying prevents smudges and ensures durability.
Sealing Cabinets
Top coats protect kitchen cabinets after staining. They keep the wood safe from water, heat, and scratches. Common types include polyurethane, lacquer, and varnish. Polyurethane is very strong and lasts long. Lacquer dries quickly and gives a smooth shine. Varnish is good for outdoor use but works indoors too.
There are different ways to apply top coats. Use a brush for detailed work and edges. Spraying gives an even finish but needs a clean area. Rags or cloths work well for wiping on thin coats. Always apply thin layers. Let each layer dry fully before the next one.
To make top coats last, sand lightly between coats. This helps the next layer stick better. Avoid thick coats, as they may peel or crack. Keep cabinets away from direct sunlight and moisture when drying. Proper sealing increases durability and keeps cabinets looking fresh longer.
Common Mistakes To Avoid
Skipping prep work causes uneven color and peeling later. Always clean and sand cabinets before staining. This step helps the stain stick better and look smooth.
Overlapping stain creates dark patches and blotches. Apply stain in thin, even coats following the wood grain. Wipe excess stain quickly to avoid sticky spots.
Inadequate drying wastes effort and causes a blotchy finish. Allow each coat to dry fully before applying the next. Proper drying time ensures a rich, even color and long-lasting finish.
Maintaining Restained Cabinets
Cleaning kitchen cabinets regularly keeps the wood fresh and shiny. Use a soft cloth with mild soap and water. Avoid harsh chemicals that can damage the stain. Wipe spills quickly to stop stains from settling in. Dry cabinets well after cleaning to prevent water damage.
Touch-up techniques help hide small scratches or worn spots. Lightly sand the damaged area with fine-grit sandpaper. Apply a matching stain using a small brush or cloth. Let it dry completely, then add a clear protective coat to blend it smoothly.
Long-term care means protecting cabinets from heat and moisture. Use coasters or mats under hot items. Keep kitchen humidity low with good ventilation. Check cabinets regularly for chips or peeling and fix them fast to avoid bigger problems.
Frequently Asked Questions
Can You Restain Cabinets That Are Already Stained?
Yes, you can restain cabinets already stained. Lightly sand and clean for darker stains. For lighter stains, fully strip and sand the old finish before applying new stain. Always finish with a protective top coat for durability and a polished look.
Can I Restain My Cabinets Without Sanding?
Yes, you can restain cabinets without sanding by using gel stain over a clean, wiped surface. Light sanding improves adhesion but isn’t always required.
What Is The Best Way To Restain Kitchen Cabinets?
Clean and lightly sand cabinets to remove grease. Apply gel stain for darker color or strip finish to lighten. Seal with a clear topcoat for durability.
How To Stain Over Already Stained Cabinets?
Clean cabinets thoroughly and lightly sand to help new stain adhere. Apply a darker gel stain for better coverage. For lighter stain, strip old finish completely and sand to bare wood. Then, apply new stain and seal with a clear topcoat for protection and durability.
Conclusion
Restaining kitchen cabinets refreshes your kitchen’s look simply and affordably. Clean and sand well before applying stain for best results. Choose the right stain type and color for your wood and style. Take your time to apply evenly and seal properly for durability.
Small steps lead to big changes in your kitchen’s feel. Enjoy your refreshed cabinets and the pride of your work.

Yes, working as , Food Blogger and Product Reviewer for last 6 years. Here you will get amazing deals for Smart kitchen products. I am your best source for the latest update in cooking trends. I provide insightful articles, reviews, and analysis on cutting-edge kitchen gadget. My mission is to empower readers with the knowledge they need to stay ahead in a rapidly evolving coking world. Join me as we explore the future of food technology and how it shapes our lives today and tomorrow.